Become a Docker Power User with Microsoft VS Code
Learn how to integrate Docker with Microsoft Visual Studio Code (VS Code). This guide covers setup, debugging, and best practices for using Docker in VS Code to enhance your containerized development workflow.

Docker in itself is a powerful tool. The Docker ecosystem has considerably matured since Docker launched six years ago. We now have tools for CI/CD, Security, Monitoring, Logging, and so much more.
However, one area that was still not as mature as the rest of the Docker ecosystem was the integrated development environments (IDE).
For the longest time, I was using plain VIM and Bash to handle all my Docker tasks, from writing Docker and Compose files to building, running, and testing images. VIM and Bash did a great job, but I didn't realize what I was missing and that a more natural workflow was available.
Enter Microsoft VS Code
Microsoft Visual Studio Code (VS Code) hit the development world by storm. The General availability release launched on April 14, 2016.
Less than two short years later the 2018 Stack Overflow survey listed VS Code as the most popular Developer environment tool at 34.9% usage. That is incredible! Availability across OS platforms Windows, Mac, and Linux has helped the adoption and the ecosystem.
I first switched to Microsoft VS Code about one year ago. A random stranger on my train journey home told me I should give it a try as he was watching me code. I installed the VS Code base configuration and added extensions for Docker, Kubernetes, Terraform, and quite some others to get started. Like myself, I found that most users I speak with are using VS Code only for code editing and Git management. VS Code does this well, but we missed the power of VS Code.
"With Great power comes great responsibility." Ben Parker, Spiderman
Like typical techies, we install applications and never bother to read the documentation for each extension because:
A) It works
B) It solves my immediate problem
But VS Code is so much more. I discovered the real potential of VS Code with Docker when I ran into a weird bug. The research of GitHub issues led me down the VS Code rabbit hole of features, which shocked and embarrassed me because I hadn't used these features.
After asking several colleagues if they use the Docker Extension as intended, it resulted in ZERO people using it this way. On the one hand, I am happy I was not alone, but why are so many people not using the full features of the extensions as intended?
VS Code and Docker
To use the Docker extension, you should install Docker for Desktop on Linux, Mac, or Windows. Next, install the Docker VS Code extension.
- On the left side of VS Code, click the Extension icon.
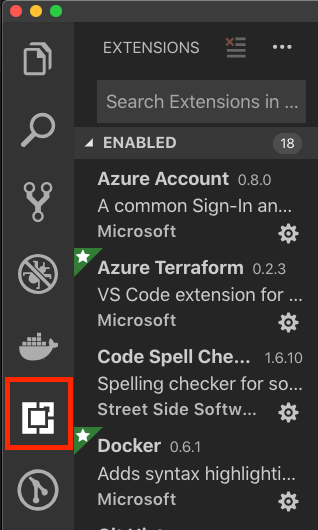
- Next, search for the official Docker extension containing the Green star and click install.

We can adjust the Docker Extension default settings by navigating to Settings (The gear icon in the lower left corner) - > Extensions - > Docker configuration.
In this menu, we can set the defaults for the default registry, what interface to use when connecting to containers, defaults for the build and run commands, and Docker Host if you want to connect to a docker daemon other than what is running locally.
New Docker Projects
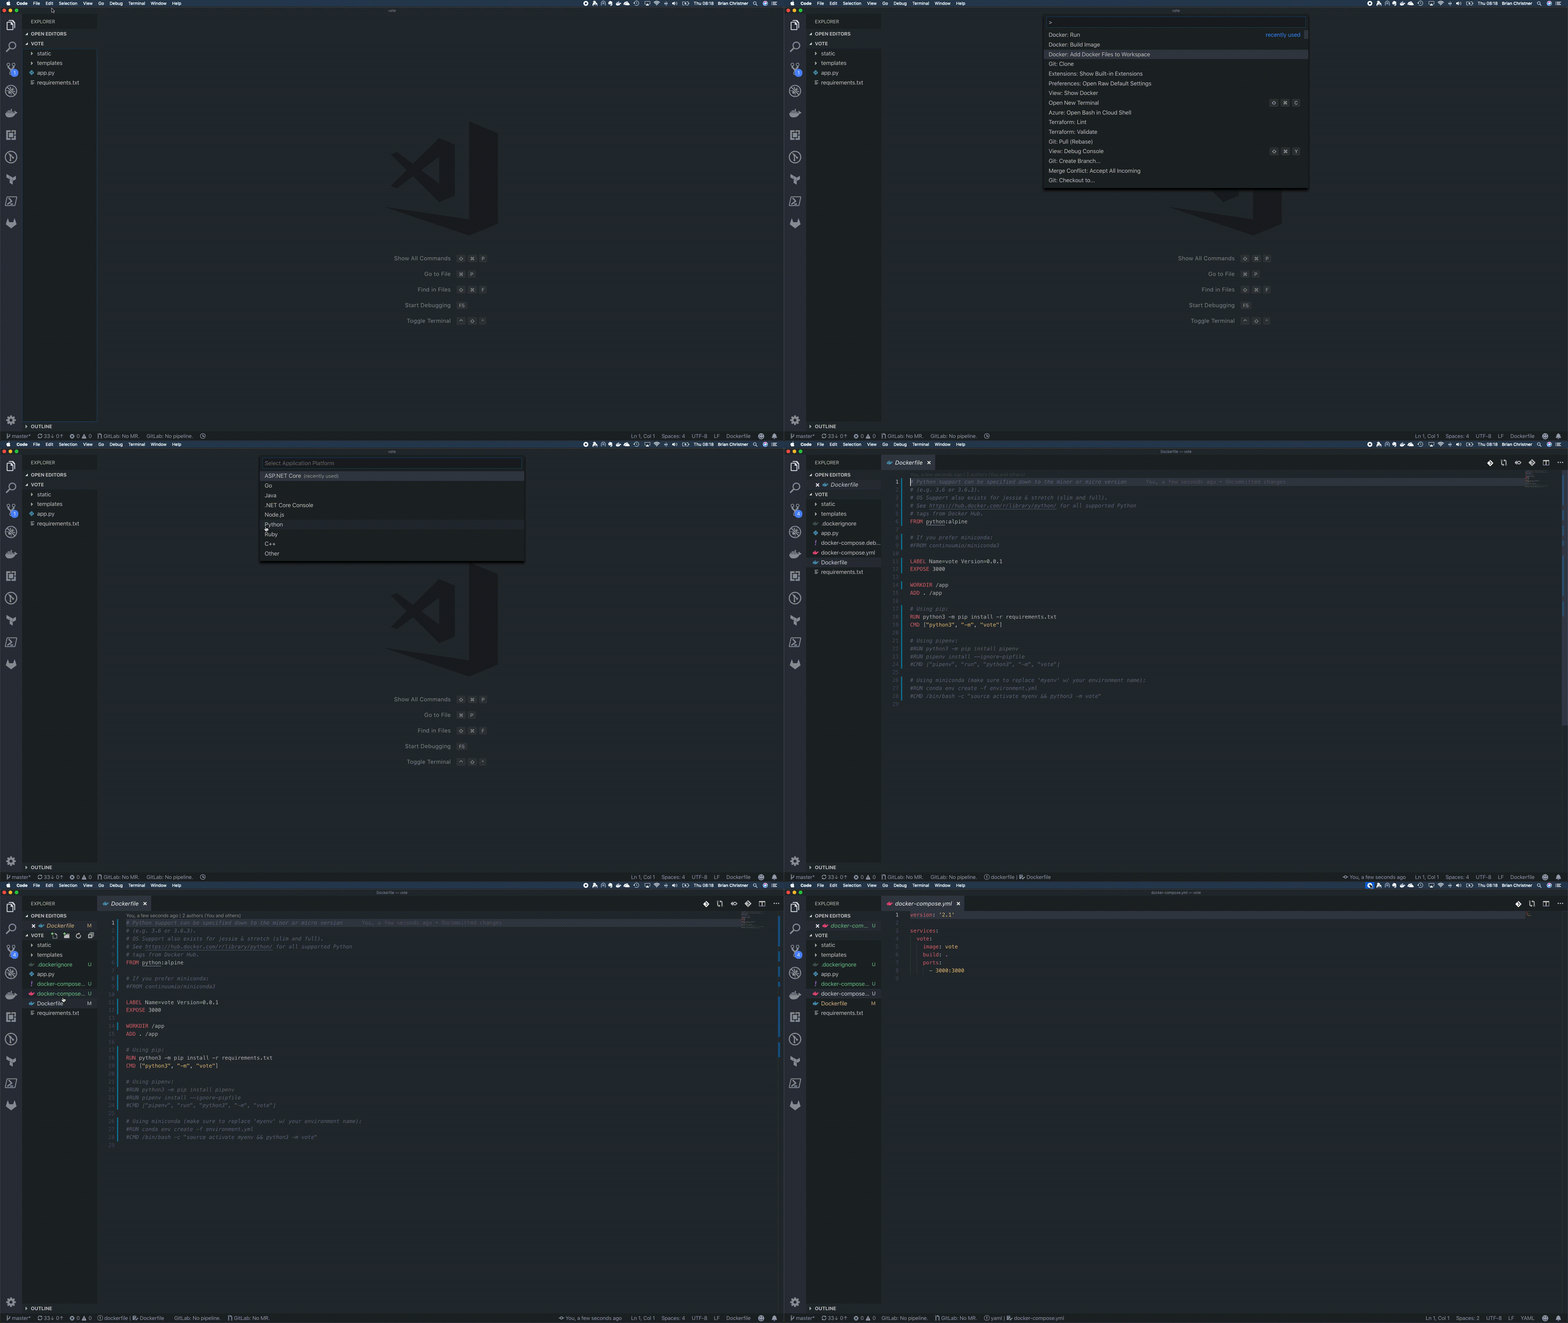
One of the most brilliant features is the creation of new Docker projects. VS Code automatically creates Dockerfiles and copies in files from your project directory.
Depending on the language Dockerfile you select it will even create Multi-stage builds as well. It saves a considerable amount of time bootstrapping your new projects with Docker.
- Open Command Palette Mac (⇧⌘P) or Windows (CTRL + Shift + P)
- Select the language your application requires (GO, .Net Core, Java, etc.)
- Select which port your application will listen on (defaults to 3000)
Writing Dockerfiles with Code Completion
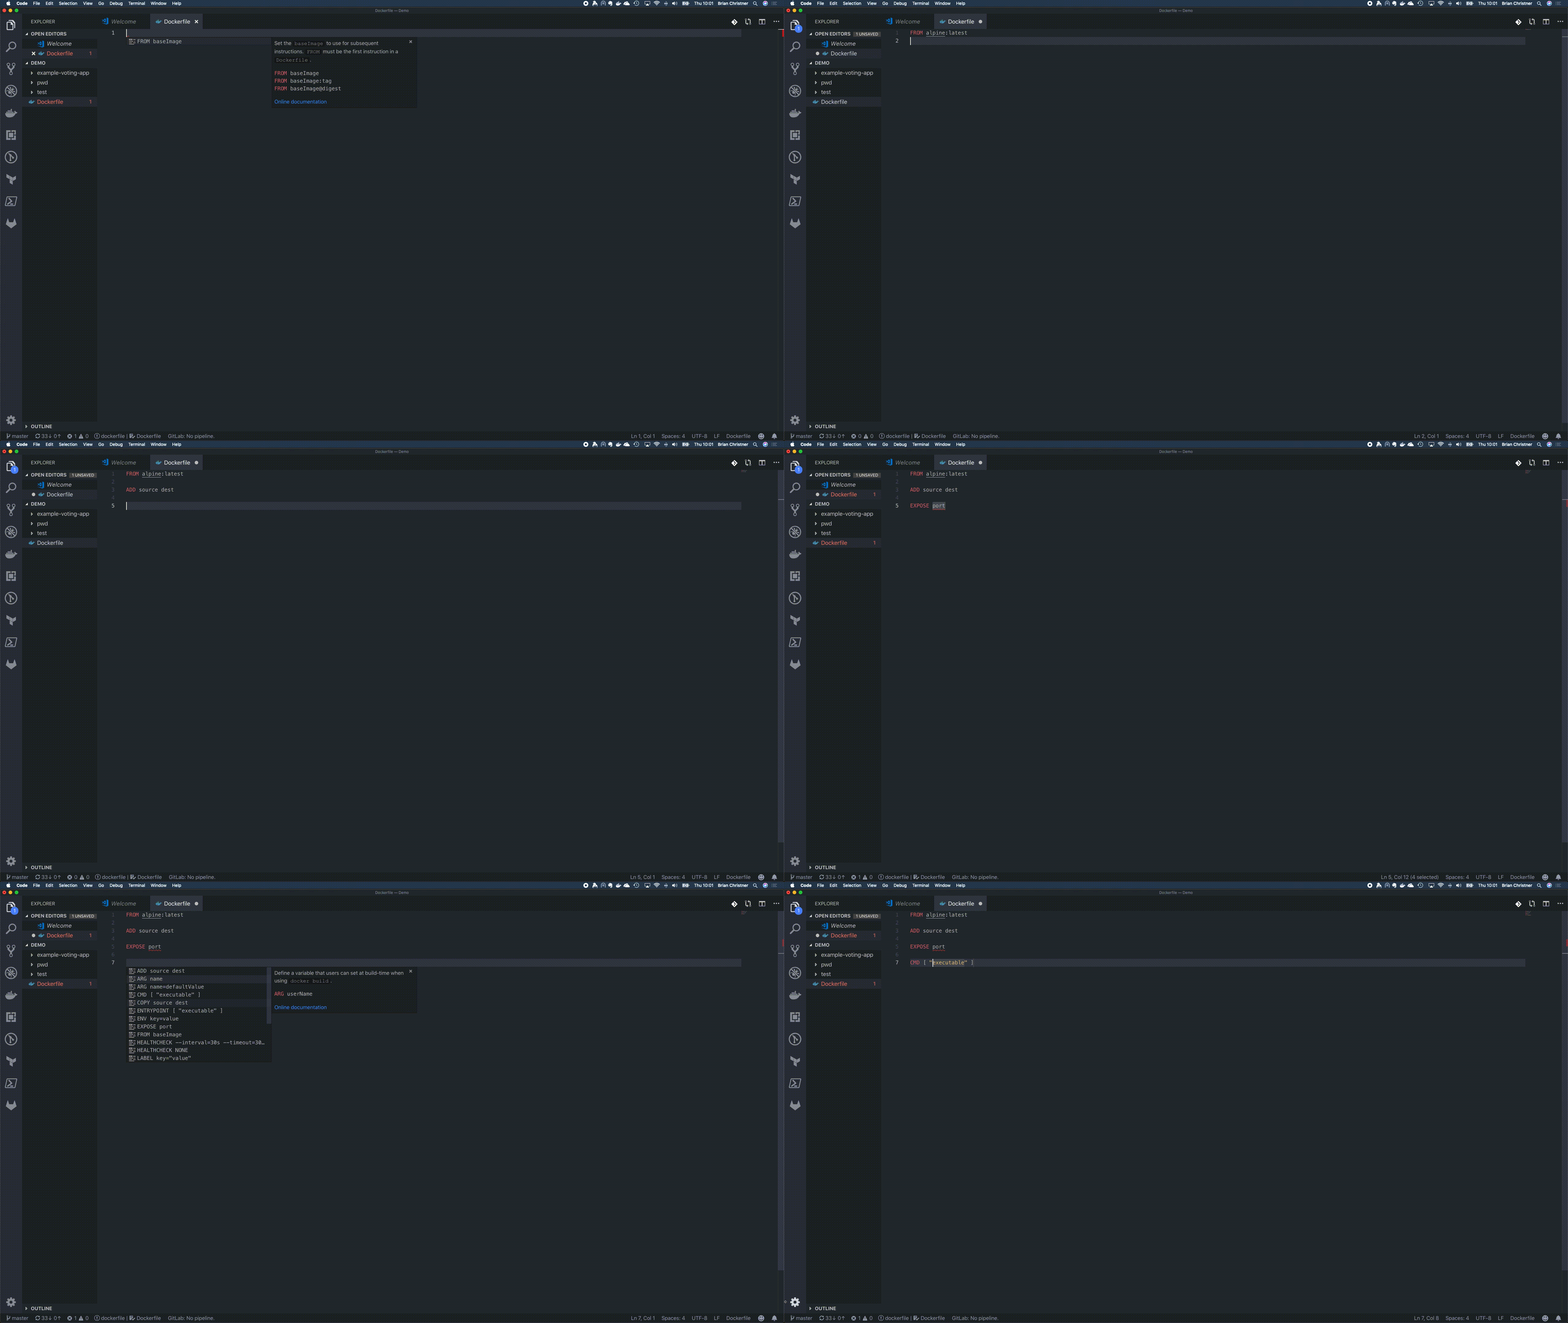
The Dockerfile command snippet also makes writing Dockerfiles easier. It allows a quick search of Dockerfile commands and includes the example syntax and a link to the exact section in the Docker documentation for further details.
The Dockerfile code completion really decreases the amount of time it takes to write a Dockerfile, and the documentation is built right in.
- Create a file name Dockerfile
- Open Dockerfile Command snippets Mac (^ + Space) or Windows (Windows key + Space)
- Search for the Dockerfile command to insert
- Click the
ibutton next to the command for documentation and link to the Docker documentation - Hit
Enterto insert the command andTabto toggle between the fields of the command
Build Docker
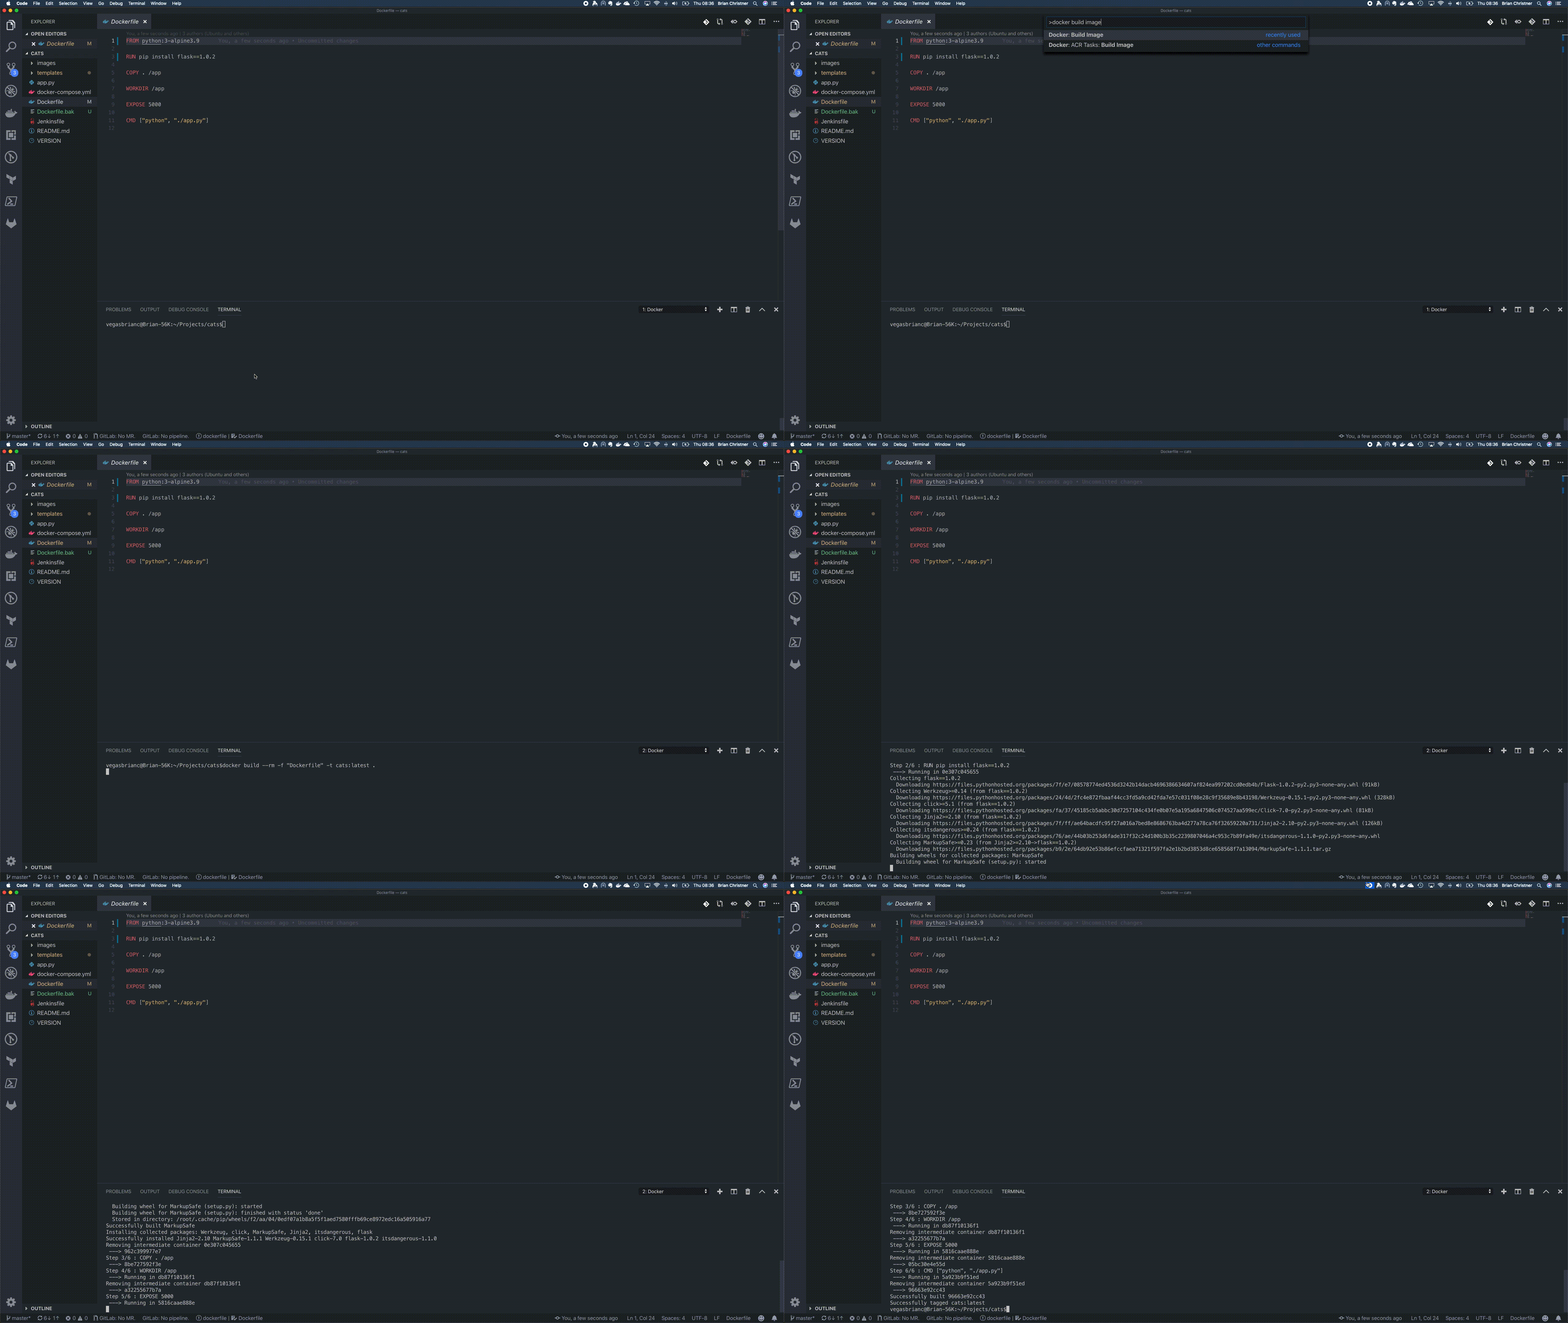
Once we have docker-compose or Dockerfiles in place, we can start interacting with them. This is where the fun begins.
- Open the command palette Mac (⇧⌘P) or Windows (CTRL + Shift + P)
- Type
Docker Build image - Provide the Docker image tag.
iis:latest - Enter will then start the Docker image build
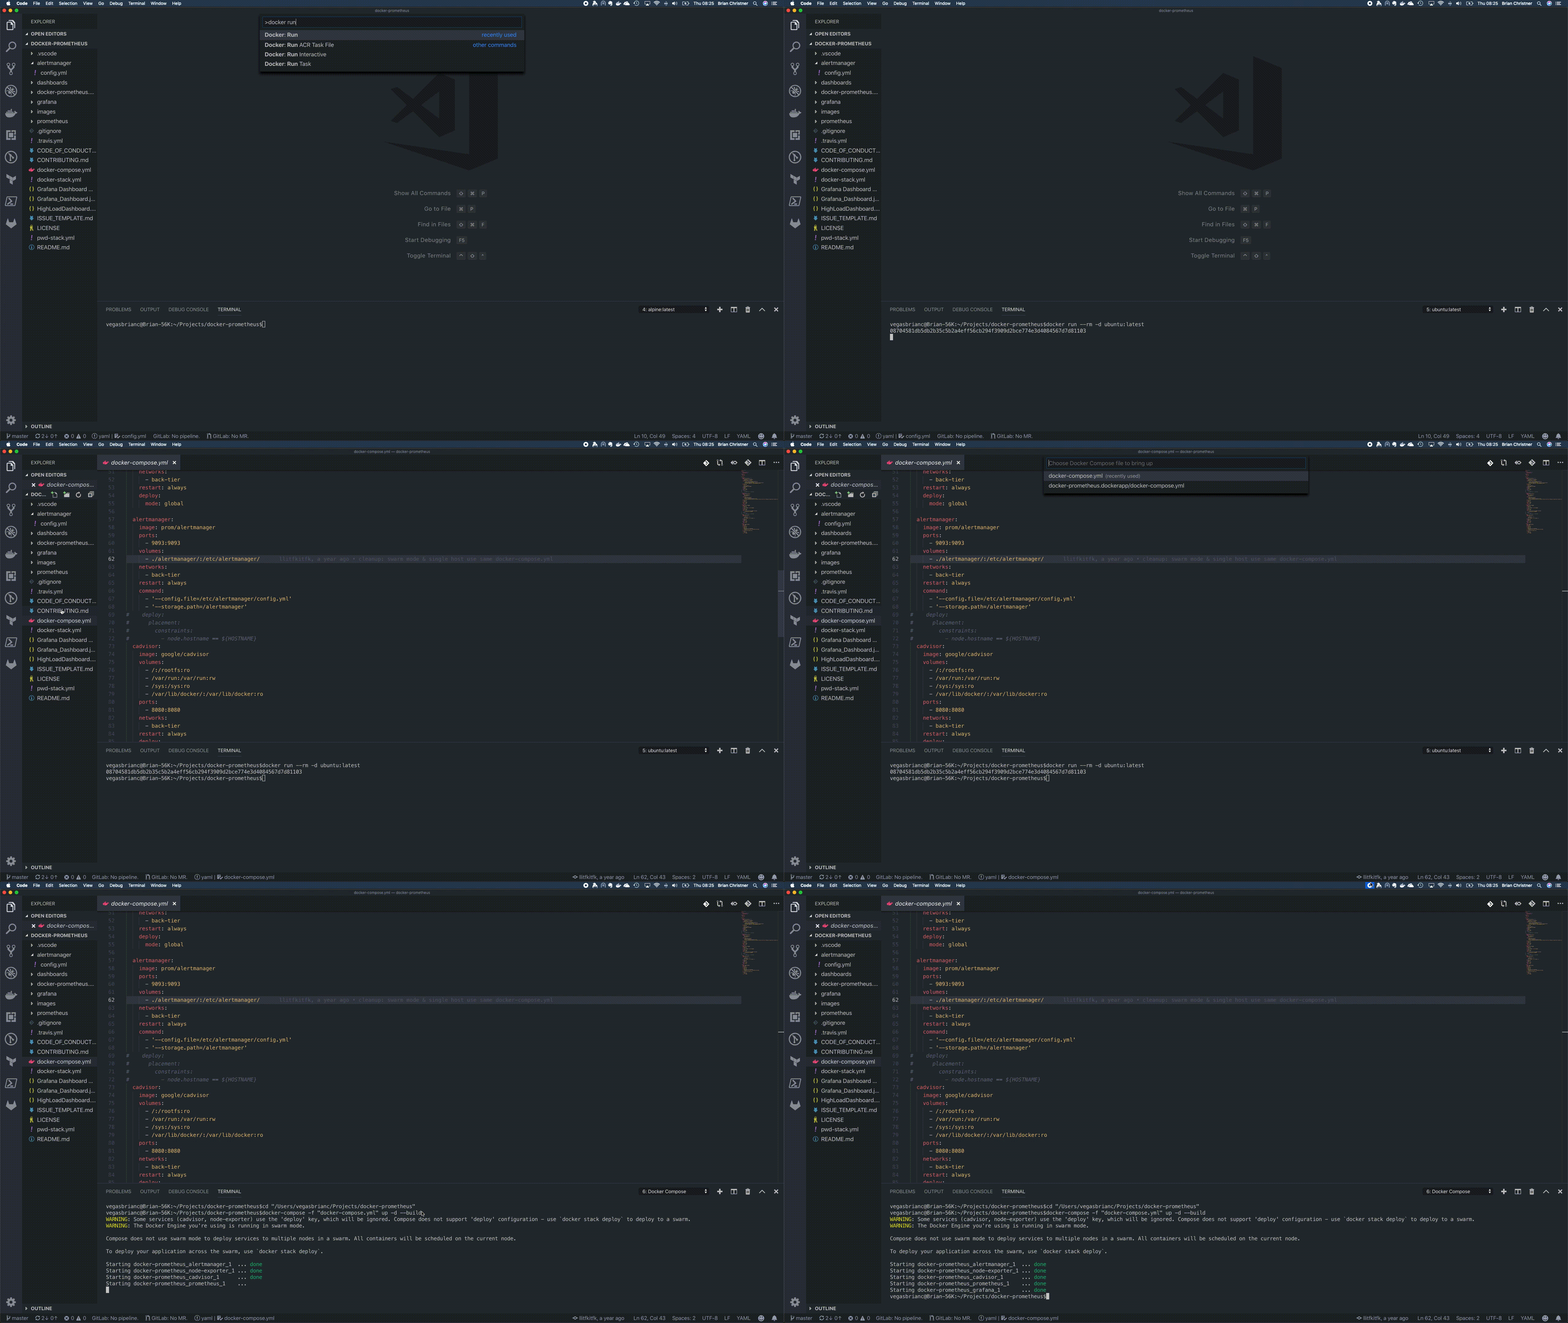
Run Docker & docker-compose
Now that we have images built, we can also run them. This works for standalone Dockerfiles or a docker-compose stack. What is quite nifty, and something I also learned, is that when running a docker-compose stack, it actually combines the run statement with a build to ensure it gets the latest versions. Slick. docker-compose -f "docker-compose.yml" up -d --build
- Type
Docker RunorDocker Compose Up - Provide the Docker image tag.
iis:latestor compose filedocker-compose.yml Enterwill then run your Dockerfile or docker-compose.
Interact with Docker images & containers
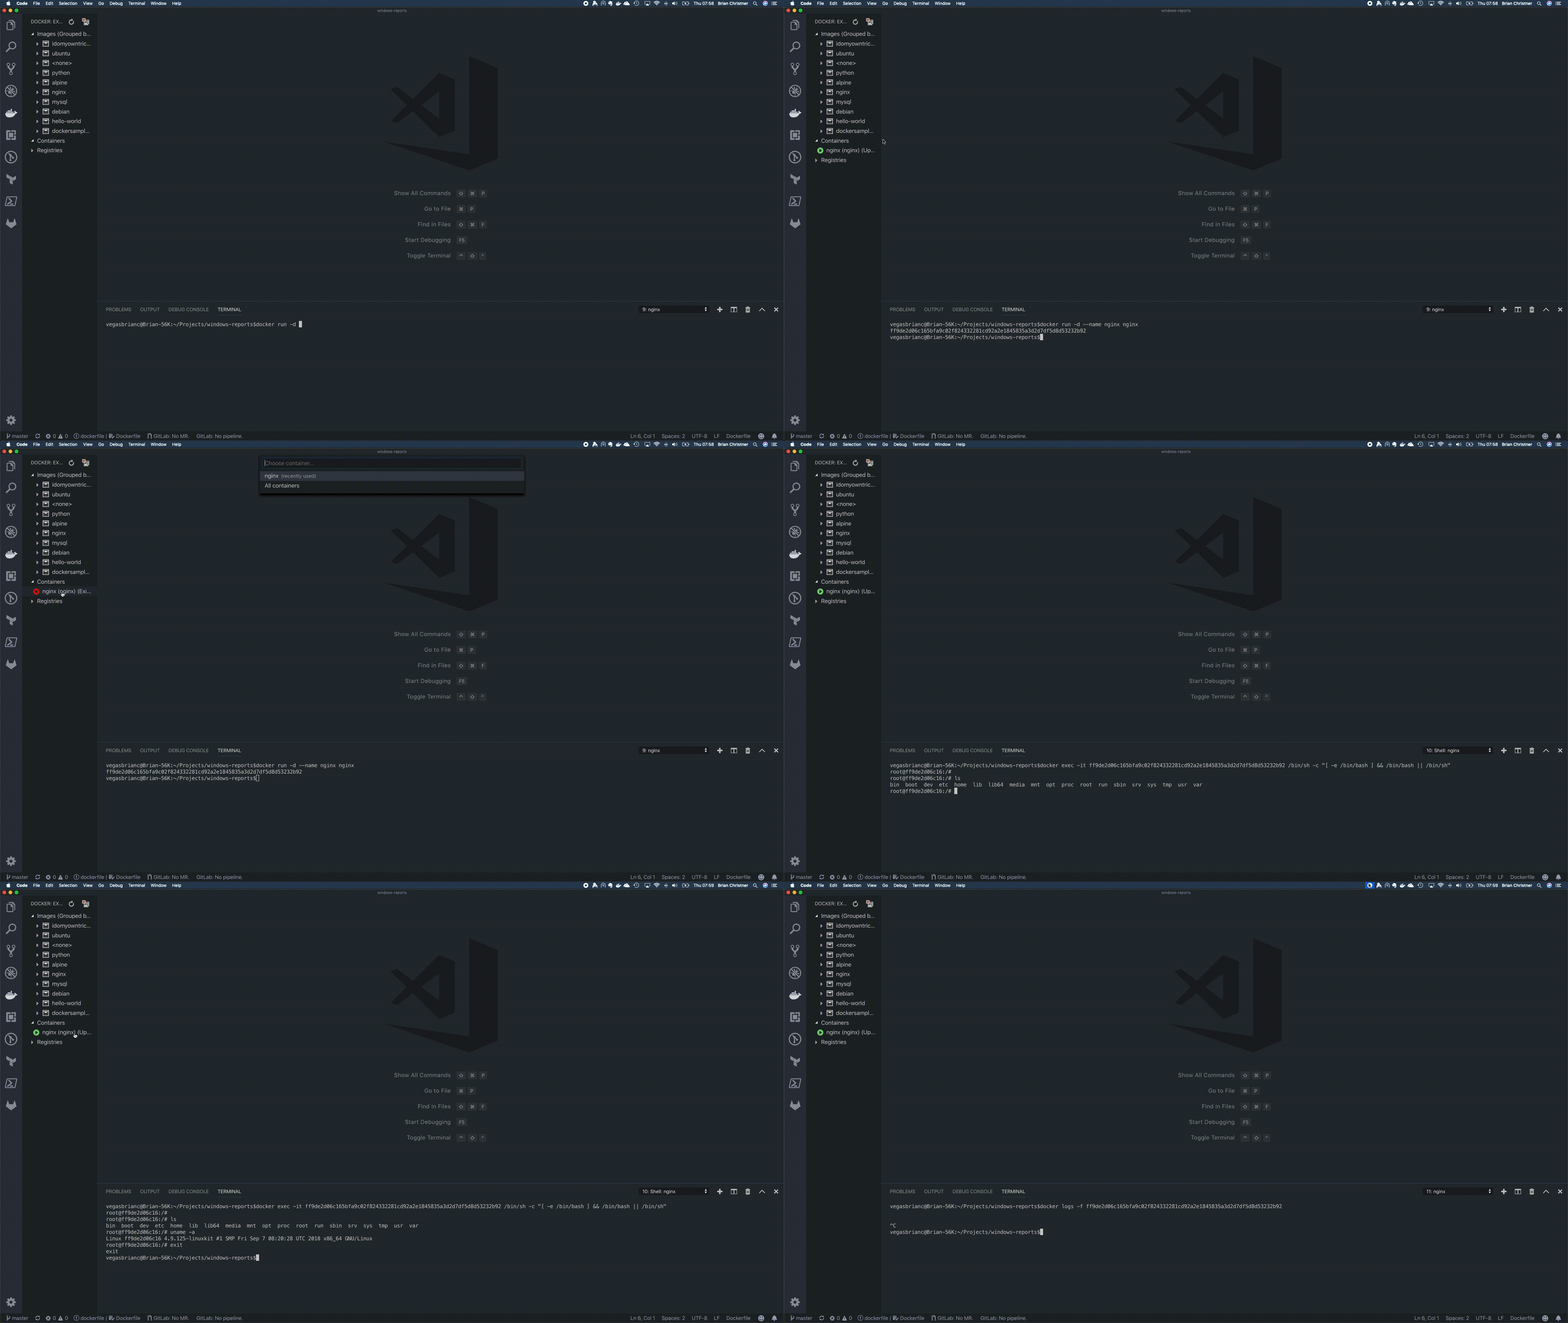
Once we have running containers, we can interact with them directly with VS Code. Click on the Docker Plugin logo on the left taskbar. Additional options now: Images, Containers, and Registries. Expanding Images shows all images available locally, containers show all running and stopped containers, and registries indicate which are available.
VS Code summary
VS Code is a fantastic tool in itself. When we expand and utilize some of the plugins, like Docker, we can take our projects and Docker skills to the next level. What brings me the most value is less context switching between different interfaces. I can now stay on one screen and write Dockerfiles, build, ship, and run them all from VS Code.
The Docker Power User Course
I created the How to Become a Docker Power user with VS Code Course.

Some of the benefits you will take away from the course:
- Unlock VS Code Shortcuts
- Improve your Docker & VS Code workflows
- Reduce context switching when developing with Docker & VS Code
- Bootstrap new Docker projects without writing a single line of code
- Learn to Debug your Docker projects
- Enable Remote Development to initialize VS Code inside containers
- Become a Docker Power User!!
FAQ Section: Docker and Microsoft VS Code
How does Docker integrate with Microsoft Visual Studio Code (VS Code)?
Docker integrates with Microsoft Visual Studio Code (VS Code) through the Docker extension, which provides a seamless development experience for containerized applications. This extension allows you to manage Docker containers, images, and volumes directly from within VS Code. You can also build, run, and debug Dockerized applications, making it easier to develop and maintain containerized projects.
What are the benefits of using Docker with VS Code for development?
Using Docker with VS Code offers several benefits, including streamlined workflows, improved environment consistency, and easier management of containerized applications. The integration allows developers to quickly spin up containers, test code in isolated environments, and ensure that applications work the same way across different machines. Additionally, it simplifies collaboration by allowing teams to share Docker configurations and environments easily.
How do I set up Docker in VS Code?
To set up Docker in VS Code, follow these steps:
- Install Docker on your machine and ensure it's running.
- Open VS Code and navigate to the Extensions view by clicking the Extensions icon or pressing
Ctrl+Shift+X. - Search for "Docker" and install the official Docker extension by Microsoft.
- Once installed, you'll see a Docker icon in the Activity Bar on the left. Click it to access Docker features like managing containers, images, and volumes directly from VS Code.
This setup enables you to work with Docker in a more integrated and efficient manner within VS Code.
Can I use VS Code to debug Dockerized applications?
Yes, you can use VS Code to debug Dockerized applications. The Docker extension in VS Code supports debugging Node.js, Python, .NET, and other languages inside containers. You can configure your launch.json file to attach to a running container or launch a new one with debugging enabled. This allows you to set breakpoints, inspect variables, and step through your code, making it easier to diagnose and fix issues in a containerized environment.
What are some best practices for using Docker with VS Code?
Best practices for using Docker with VS Code include:
- Use Docker Compose: If your application consists of multiple services, use Docker Compose to manage them. VS Code’s Docker extension supports Docker Compose, making it easier to handle multi-container setups.
- Leverage Dev Containers: Use VS Code’s Dev Containers feature to define a consistent development environment for your project. This ensures that all team members work in the same environment, reducing "it works on my machine" issues.
- Automate with Tasks: Create VS Code tasks to automate common Docker commands, such as building images or starting containers, to streamline your workflow.
- Use Version Control: Store your Docker configurations and VS Code settings in version control to ensure consistency and ease of collaboration.
Following these practices will help you get the most out of Docker and VS Code, improving your development process and productivity.
Follow me
If you liked this article, Follow Me on Twitter to stay updated!


