How a Single Raspberry Pi made my Home Network Faster
Discover how a single Raspberry Pi can speed up your home network by acting as a DNS server. Learn the steps to set up Pi-hole and enjoy faster, more secure internet today!
Our household has a few Raspberry Pis doing various tasks such as tracking airplanes flying overhead, measuring temperature humidity in our house, Docker projects, and several more hidden away for a rainy day.
The rainy day finally arrived when I stumbled across a new project.
This time, it is entirely different (I always say this). However, it's true. This Raspberry Pi project Pi-hole is the gatekeeper to our home network.
Traditional Ad Blockers are usually Browser Plugins or software utilities on every computer on your network. Managing all your devices is cumbersome and hard to maintain. It leaves a gaping hole for network-connected devices like TVs, Printers, Alexa, Sonos, or any other smart devices connected to your network. The Pi-hole blocks Ads, Malware, and overreaching metrics collection network-wide.
Since I switched to SimpleAnalytics to stop tracking people on our websites, I thought I would apply the same principle to our home network. Now, I also get to decide how to serve metrics and ads.
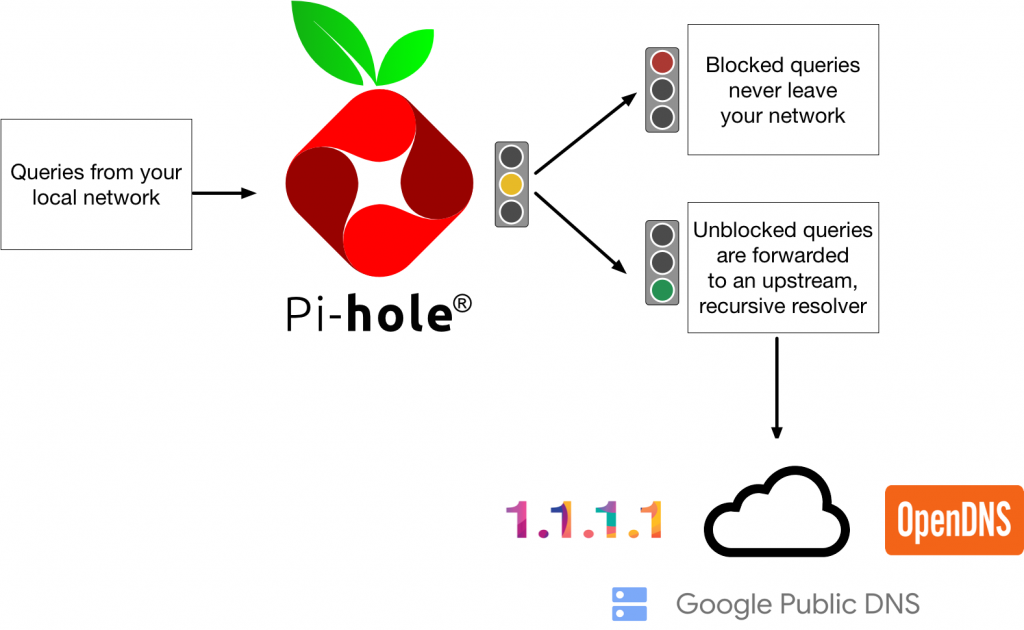
How does the Pi-hole work, though? The Pi-hole answers your computer’s DNS queries, and if it is a domain on the blacklist, it sends the request to the Pi Web server. This Web server serves up a blank page. So, instead of loading the ad from the actual domain, the blank page from the Pi is downloaded, thus “blocking” the ad or metric.

Installing Pi-hole
Installing Pi-hole should simultaneously increase performance and security for our home network. The risk of the project is that a single Raspberry Pi is now the single point of failure for my network, so reliability becomes a concern. I am entirely confident that I can rely on my entire home infrastructure on a $35 Raspberry Pi running an Open-Source project.
Like any other project, I run everything in a Docker container, and this project should be no different. The Pi-hole project already has an excellent Docker project utilizing compose. The Pi-hole Docker install is well-documented and quite nicely done. After installing Docker on the Raspberry Pi, it was an easy git clone, a couple of modifications to select my timezone and preferred DNS servers CloudFlare 1.1.1.1, then docker-compose up, and we were in business.
Stay Updated
Get actionable AI & tech insights delivered every Friday. No fluff, just value.
Subscribe to The Weekly Byte →Once Pi-hole is running, I will switch over my network to Pi-hole. I configured my router to use the Pi-hole IP address as the new DNS server for my network. That's it! Now, every device that connects to my router is taking advantage of Pi-hole.
Pi-hole in Operation
Now that my network is funneling through the newly configured Pi-hole, it's time to look at the Dashboard. The dashboard is a friendly interface that greets you with fantastic statistics and visualizations immediately.
- Total Queries
- Queries Blocked
- Percent Blocked
- Domains Blocked
- Queries last 24 hours
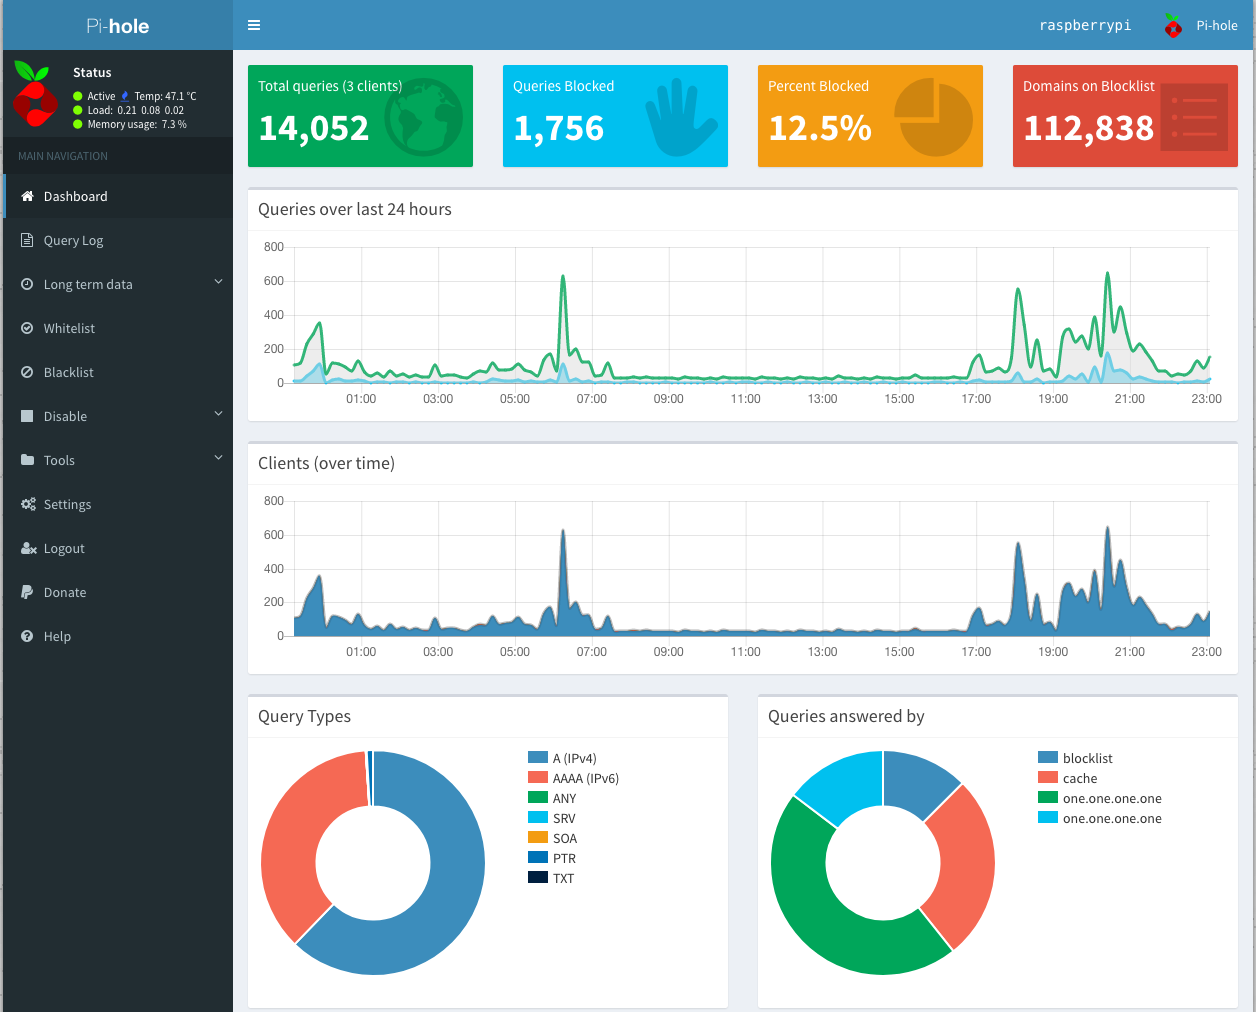
The menu bar on the left side of the Dashboard offers even more functionality. We can whitelist or blacklist URLs, query log files, update the URL block list, and all sorts of reporting options. The level of detail and functionality is impressive and adds confidence. Considering all the functionality and that my entire network is now routing through my Raspberry Pi 2, the performance is phenomenal, running an average of 8% memory utilization.
Review after one month in operation
The Pi-hole has been running for one month now on my home network. I had to whitelist 1 or 2 URLs, which was blocking a reset of an Alexa, which had an issue, and a video conferencing system with all sorts of tracking and metrics built in, which caused havoc until I whitelisted them. Otherwise, the Pi has been chugging along at 8% memory utilization, and the network is considerably faster when surfing the web, and the difference is incredible.
Statistically, our household is averaging 15% of queries blocked and a spike over a lousy weather weekend of 30% blocked. It is scary and incredible to think the number of ads and metrics forced upon us, and this number continues to increase. I am delighted with the Pi-hole project and recommend it to everyone.
FAQ Section: Optimizing Home Network with a Raspberry Pi
What is a Raspberry Pi and how can it improve my home network?
A Raspberry Pi is a small, affordable computer that can be used for various projects. In home networking, it can act as a DNS server, reducing latency and speeding up your internet connection by caching DNS queries and blocking ads.
How does setting up a Raspberry Pi as a DNS server speed up my network?
By setting up a Raspberry Pi as a DNS server, it handles all DNS requests locally, reducing the time it takes to resolve domain names. This means quicker access to websites and faster overall internet speeds.
What are the steps to configure a Raspberry Pi as a DNS server for my home network?
To configure a Raspberry Pi as a DNS server, you need to install DNS software like Pi-hole, configure your router to use the Raspberry Pi as the primary DNS server, and set up the Raspberry Pi with a static IP address. Detailed instructions can be found in the blog post.
Can a Raspberry Pi handle the internet traffic of a typical household?
Yes, a Raspberry Pi is powerful enough to handle the DNS queries of a typical household. It efficiently manages multiple devices, ensuring a smoother and faster network experience.
Are there any additional benefits of using a Raspberry Pi in my home network?
Besides speeding up your internet, a Raspberry Pi can block ads and trackers, enhancing privacy and security. It also provides insights into your network traffic, helping you monitor and manage your internet usage more effectively.
Follow me
If you liked this article, Follow Me on Twitter to stay updated!